How to Prepare for a Headshot Photo Session
Most people assume that headshots are for actors or actresses to help casting directors choose if they’re the right fit for a role, but that isn’t the case at all. Headshots are a powerful way to market yourself. You could be a business person, model, lawyer or perhaps you just want a good clean Facebook profile image of yourself. In this post I explain how you should prepare for a headshot session with a professional photographer.
Picking a Photographer
Photographers are like snowflakes. There are no two that are alike. Each one has its own individuality including shooting style and editing style. They also have their own, what I like to call, ‘camera-side manner’. Perhaps one photographer is very laid back with their clients and like to keep a casualness to their shoots, while others are more stoic and like to keep a more business-like setting to their sessions. Does either style make one less professional? Absolutely not. It’s all a matter of preference.
Photographers also come with different levels of expertise. This should not be confused with how long a photographer has been shooting. In my experience, I have met photographers that have only been shooting for a few short months and have some amazing work under their belt while I have met some photographers that have been shooting for 20+ years and their work can be lacking. Don’t be fooled by the length of time they have been shooting. Judge by the quality of their work.
So, when looking to hire a photographer your best bet is to look at their portfolio. Nowadays any photographer worth their salt has some type of online portfolio that you can view at your leisure. Earlier I mentioned quality. Everbody wants the best quality headshots, right? Well, quality will cost you. It’s like the old saying, ‘You Get What You Pay For.’ This is very true with not just headshot photography, but all specializations. Does that mean you’re going to expect to spend thousands of dollars? Not at all. Most quality headshot photographers will charge anywhere between $350-$800 a session.
Different Types of Headshots
Photographers have different styles of shooting, but also be conscious of the style that you want. Headshots come in different orientations and styles. It’s your preference that will be the deciding factor of what you’ll receive. Below are some styles of headshots. Let your photographer know what your preference is before booking. Let them know what color backgrounds you want before you book so that the photographer can order any backdrops that are needed. I personally always try to shoot on white. White backdrops are cleaner and better looking in my opinion.
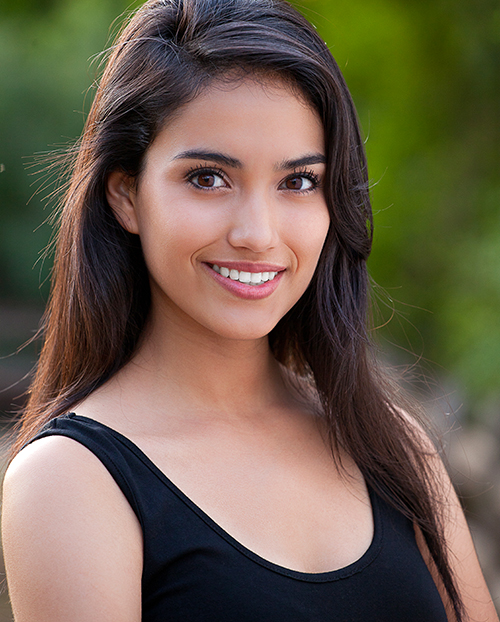
1. Vertical Studio Headshot
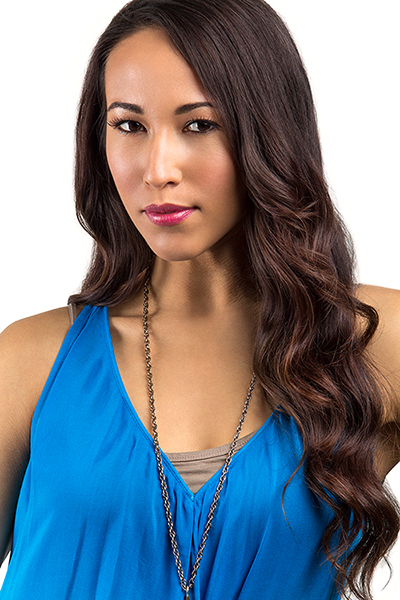
This is probably the most common style of headshot you’ll see. It’s vertical in orientation. Most headshots are typically closer to the face than the example above, but some people like to show their clothing in the shot letting your market get a better sense of who you are and what your style is. The backgrounds can come in different colors and textures.
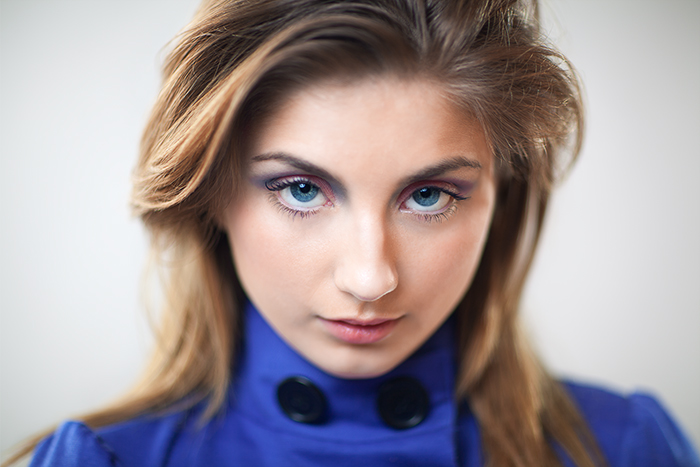
2. Peter Hurley Style
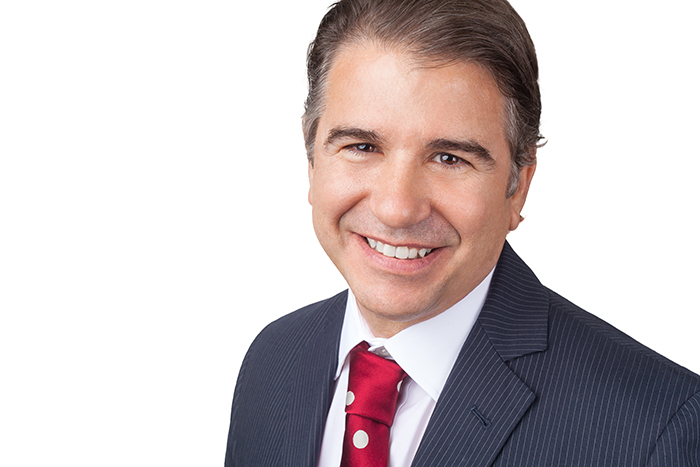
Peter Hurley is a headshot photographer based in New York. He pretty much invented this style of headshot. Horizontal instead of the traditional vertical usually with a nice and crisp white background. This is the style of headshot that I personally like to shoot. It’s cleaner and fresher in my opinion. Peter uses a very specific lighting setup, but the look can be achieved in a multitude of different ways. This style I find works great for the internet. It will look great on a website or as your avatar (profile image) on different social media sites like Facebook, Twitter or LinkedIn. The background doesn’t necessarily have to be white, it can be any color you choose like the example below. Fstoppers.com has produced a DVD on Peter Hurley’s style of Headshot Photography. Pick up a copy here: The Art Behind the Headshot DVD
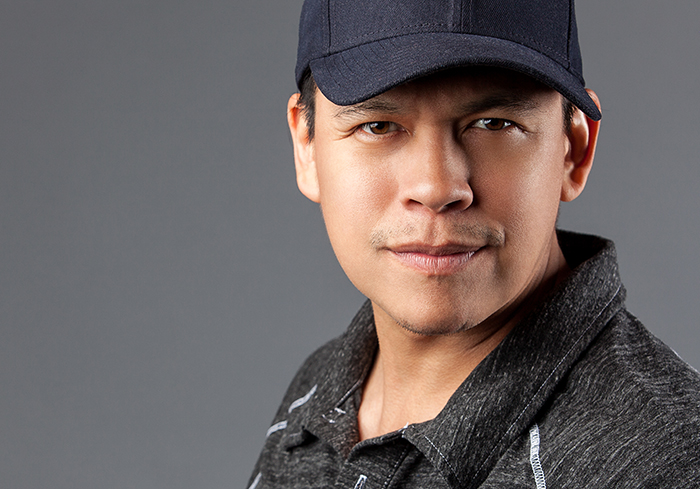
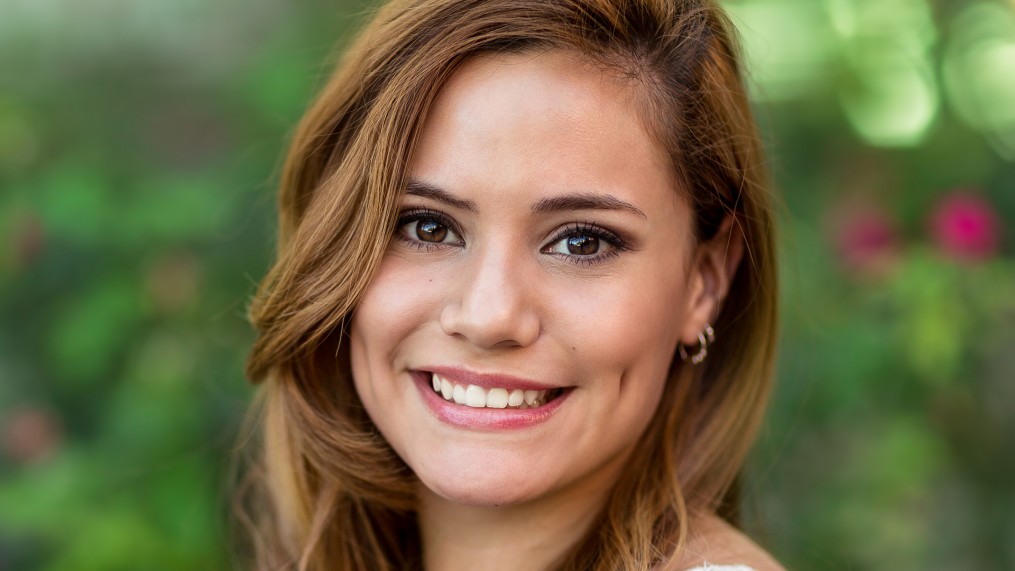
3. Environmental Headshot
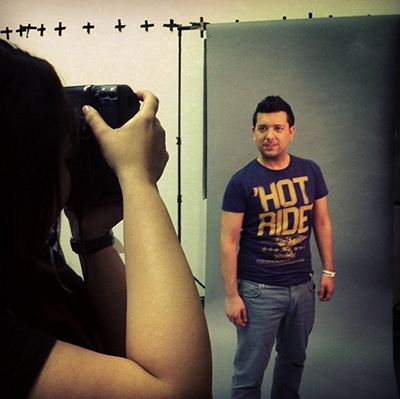
Environmental headshots are basically shots that are taken outside of a studio. It can be indoors or outdoors, and be shot with natural light or artificial light. These I find are the more casual types of shots, if you’re looking to show a more laid-back side of you. You’ll know a good outdoors headshot when you find that the background is blurry separating you from the background. This is a photography term known as Bokeh. Bokeh is great, and the more the better.
Getting Ready
So, you’ve booked your photographer, chosen the style of shots you want and picked a location. Now what? A few days before your shoot you’ll want to start getting prepared. If you’re properly prepared for the shoot you’ll not only have an easier and more stress free time during the shoot, but the resulting images will look a ton better than if you just winged it.
1. Clothes
Clothing is a form of expression and the clothes that you pick to wear will reflect your personality in the images. My best piece of advice when choosing clothes is the simpler the better.
- Solid colors look great in headshots.
- If going with a pattern keep it simple.
- Start with a simple shirt or blouse and slowly add layers.
- Bring a few changes of clothes to the shoot.
- Make sure that ALL clothes are ironed and pressed before the shoot. Wrinkles in clothes are difficult to Photoshop out. Don’t expect the photographer to do this.
- Bring a lint brush or roller with you.
- Don’t worry about shoes if just shooting headshots. Be comfortable.
2. Hair
- Bring a brush and some hair product (gel/hairspray) with you to the shoot to help calm fly-aways.
- Start with your hair down and towards the end of the shoot put it up in a ponytail for a more casual look.
- If you can afford it hire a hair stylist for the morning of the shoot.
3. Makeup and Face
- Start natural. Just enough to cover up any blemishes.
- Build up the makeup as you go. Add eyeshadow and darker lipstick later in the shoot.
- Try not to use matte styles of makeup. It will dry out your skin.
- Bring your makeup and moisturizer with you to the shoot in case your skin does get dry or you need touchups.
- Bring lip balm or lip gloss with you to help keep lips looking soft.
- The night before brush your lips with your toothbrush to help get rid of any dead skin.
- Don’t do any extreme beauty regimens right before your shoot, like facial peels, tanning or extensive exfoliating. Your skin can look very irritated.
- Get rid of any unwanted hair a few days before your shoot. Clean up brows and upper lip hair.
- FOR MEN. Shave right before you leave for a shoot. A 5 o clock shadow can’t be Photoshopped easily. Use cooling gel or aftershave to help with skin irritation.
- Bring some oil absorbing sheets to soak up any oil or sweat that might build up during the shoot. The studio lights can get pretty hot. Some great sheets are the Clean and Clear: Oil Absorbing Sheets. You can find them at any Wal-mart or local drug store.
- Leave your colored contacts at home and bring clear contacts with you. Colored contacts can look very fake in photographs. Bring eyedrops with you.
- If you can afford it, hire a Makeup artist to do your makeup and stay with you during the shoot for touchups.
4. Practice Makes Perfect
- Before the shoot look at your face in the mirror and see what side you like better. Everyone has a good side, find yours. Remember though, a mirror will flip your face and the camera won’t so the images might look a little different than you were expecting.
- If you have one eye that is visibly smaller than the other bring the side of your face with the smaller eye towards the camera. It will help reduce the difference between the two.
- Try different expressions in the mirror. Do you look better stoic or perky? A good photographer will get different expressions from you during the shoot.
5. During the Shoot
- Follow the photographer’s direction. Even if it sounds a little silly. We know the best posing on headshots and the best way to shape your face. You may feel a little funny posing differently, but trust me the photos will look great.
- Ask the photographer to put some music on if shooting in a studio. This will help ease some tension. Let him/her know before the shoot starts what you like to listen to.
- Relax a little. Headshot sessions should be fun. Don’t be afraid to let your guard down.
- Don’t force your smile. It will look awkward in the images and your cheeks will be sore after the shoot. A good tip is to leave a little space between your teeth when smiling, enough to put the tip of your pinky in between. Your smile will look more genuine.
- Squint, Squint, Squint!!! Squinting your eyes just a little will also help the shots look more confident and natural. The deer in headlights look is pretty horrible.
- Relax after a few shots and take a breather. Take a sip of water and step away from the lights every so often.
6. After the Shoot
Not only do photographers have different shooting styles, but editing styles, as well. Let them know how you want the photos to be edited.
- Do you want any imperfections Photoshopped out? Some people like everything to be cleaned up in their headshots. (Freckles, moles, scars ect…) While actors and actresses need to be mindful that casting directors want to see any imperfections or distinguishing marks you may have. This shouldn’t be confused with blemishes or acne. This is something that should be discussed with your photographer. If he/she doesn’t bring it up, then you bring it up. Don’t feel awkward asking or being asked about this, if they’re truly a professional then they’ll expect this.
- Everyone asks ‘Can you Photoshop this… or this… I have a double chin, can you get rid of that? Can you make my eyes bigger?’ Well, that depends. Sometimes we can, sometimes we can’t. Every image is different and Photoshop can be a beast when editing. We will try our best to make you look amazing. If you don’t want any alterations done, please let us know beforehand.
- If you do want any major editing done, please keep in mind that it may cost extra.
- Do keep in mind that as photographers we spend more time editing than shooting. Please give us a realistic time frame to deliver your photos. If you want major editing to be done, expect that it may take a little longer for them to be finished.
Hopefully this guide will help you prepare for your big day in front of the camera, and will make your experience a little more stress-free. If you have any questions feel free to comment below or email me at info@rebeccabrittphotography.com
-Rebecca Britt
Rio Grande Valley Commercial Photographer (McAllen, Texas) 956.309.9816
EDIT (07/27/2017)
A NOTE TO PHOTOGRAPHERS:
This blog is completely original content, please do not copy and paste this or try to plagiarize this content for your own websites. The guides that I publish on this website are for any clients or potential clients that need a little help preparing for my services. This is not a fair use blog, it is NOT meant to be used by other photographers, and is in commercial in nature and not for educational purposes. Anything (A small blurb) taken from this should be properly attributed back to the page and properly credited. If you do not know how to do so, then please do not copy anything from this website.

Great write up rebecca. I added it to my favorite links page on my web site. It just as important for the client to be ready for head shots as it is the photographer!
Great article!
Great advice. You covered all the bases in a clear, concise way. Excellent photo examples.
[…] Most people assume that headshots are for actors or actresses to help casting directors choose if they're the right fit for a role, but that isn't the case at all. Headshots are a powerful way to market yourself. […]
Great article , I have yet to do any portraits , so this article is quite helpful for a photographer and a customer.
Great article!!
I have yet to get my own lighting equipment and a good location for doing studio shoots.
Thanks for sharing!! 😀
This is a great article. How much would you charge for one headshot?
I sometimes find myself in the Dallas area (mostly with family) I always try to shoot at least one collab shoot while I’m there. Just add me on Facebook and perhaps next time I find myself there we can work together.
Thanks so much for posting this, for newbies to the acting game, such as myself! I’m needing to get headshots and this really helps me to prepare. I wish that you were closer to Dallas as I’d love to work with you! 😉
Thanks again & God Bless,
~ Chel
Thanks for the advice to pick a photographer based on their portfolio – not based on how long they’ve been working for. I’ve never had a headshot taken before, so I think that I’d be tempted to go with someone who has been doing it for a while. But you’re right; at the end of the day, it’s the quality that counts and you have to go to a portfolio to find that out. Also, thanks for the Peter Hurley tip. I’m starting up a business and the headshot will be for the website, so I appreciated that you mention that it works very well online!
I appreciate your tips. I need to get a good head shot for my company profile. The only thing that I knew I needed to do was to listen to the photographer. It does sometimes feel weird to do what they say though. However, that is why they are holding the camera and I am reading the how to. Thanks.
Rebecca, Great information as I prep for an outdoor photo shoot. ~Heather~
Those are really professional headshots, really nice.
I’m getting headshots for my family and I didn’t realize there were so many options! I like the environmental headshots because it will look more natural with the lighting. Bokeh sounds like it is very important for the headshot to look good, so I’ll make sure I find a photographer who knows about that.
Great checklist. I particularly like your suggestion to put the smaller eye closer to the camera with people where one is larger than the other. My two cents: avoid alcohol the prior night… hydrated skin looks fresher.
Excellent Article. It always surprises me how many people come unprepared for the headshot session. When I was a new photographer I realized that I was not educating my clients enough on preparation.
Great article and very well explained. I believe in professionals so this is a very useful article for everyone. Many thanks for your share.
Really helpful article! Great advice for each step of the headshot process. I especially like the explanation of different styles. Thanks for posting this!
This is great! What a lot of helpful information!!!
[…] How to Prepare for a Headshot Photo Session […]
I searched for Photoshop tutorials on Google for weeks and came across this. This has been one of the best article I have come across in a long time. Thanks for sharing!
It sure was helpful when you said that wrinkles on clothes are difficult to Photoshop out so it’s best to have your clothes ironed and pressed before the shoot. My sister and I are interested in hiring a portrait photographer. We want to make sure that our portrait photos will look extremely good and professional because we’ll display our photos in our house. We will do all your tips to ensure that we’ll be satisfied with how our photos will look.
Wonderful!!!!…Blog. Thanks for sharing. It is actually good. I like It.
One of the best articles I’ve ready for clients. Really key information. Thanks for sharing!
Thank you for mentioning that there are different levels of experience among photographers, which should be taken into account when hiring one. This isn’t dependent solely on how long they’ve been in the business, as you indicated. I’ll make sure to share this with my brother because he’s been considering hiring a headshot photographer for his portfolios and resumes. I’ll look into any photographers who might be able to assist him.
Excellent weblog right here! Also your web site a lot up very fast! What host are you using? Can I am getting your affiliate hyperlink in your host? I desire my website loaded up as fast as yours lol
What a nice List – mor is really not necessary. Most clients like to be educated a little and most certainly both – cleint and photogrpaher – can take advantage of this.